To discover innovative DIY leak detection methods, start by visually inspecting your plumbing fixtures for any signs of leaks like pooling water or discoloration. Consider using water leak detectors for early detection and continuous monitoring. Try dye testing by adding food coloring to toilets and sinks to spot leaks inexpensively. Pressure testing involves pressurizing your plumbing system to identify drops indicating leaks. Monitoring water meter readings for unusual spikes can also help. Finally, exploring thermal imaging, sound tests, and DIY smoke tests can provide advanced leak detection solutions. Embrace these methods to safeguard your home effectively.
Key Takeaways
- Use food coloring in toilet tanks and around faucets to detect leaks through color changes.
- Employ pressure testing to identify leaks by monitoring pressure changes in the plumbing system.
- Utilize thermal imaging to locate hidden leaks by detecting temperature variations.
- Employ acoustic listening devices to detect sounds of water escaping pipes for efficient leak location.
- Implement DIY dye testing and pressure testing methods for cost-effective and accurate leak detection.
Visual Inspection Techniques
When conducting a visual inspection for leaks, make sure you thoroughly examine all plumbing fixtures and pipes. Start by checking under sinks for any signs of water damage, such as warped cabinetry or water stains. Move on to inspecting the areas around your toilets and showers, as these are common places for leaks to occur. Look for any pooling water or dampness on the floor. Don't forget to examine the walls and ceilings for any discoloration or bubbling paint, as these could indicate a hidden leak.
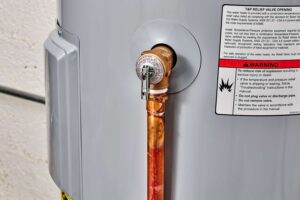
Next, scrutinize your water heater for any signs of leakage. Check the area around the base of the water heater and look for any rust or water accumulation. Additionally, inspect the connections to the water heater for any moisture or corrosion. It's also essential to examine any visible pipes for signs of dripping or pooling water. Leaks can occur at joints or connections, so pay close attention to these areas during your inspection.
Utilizing Water Leak Detectors
To enhance your leak detection efforts, consider incorporating water leak detectors into your monitoring system. These devices can help you detect leaks early on, saving you time and money in the long run. Here are three reasons why water leak detectors are a valuable addition to your home:
- Early Detection: Water leak detectors can alert you at the first sign of a leak, allowing you to address the issue promptly before it escalates into a larger problem.
- Continuous Monitoring: These detectors can provide round-the-clock monitoring, giving you peace of mind knowing that your home is being watched even when you're not around.
- Water Conservation: By quickly identifying leaks, you can prevent unnecessary water wastage, contributing to both environmental conservation and cost savings on your water bill.
Integrating water leak detectors into your home can be a proactive step towards maintaining a leak-free environment and ensuring the safety of your property.
DIY Dye Testing Method
Consider incorporating a simple and effective DIY dye testing method to detect leaks in your home plumbing system. This method involves adding a few drops of food coloring into the toilet tank and waiting to see if the color seeps into the bowl without flushing. If you notice the colored water in the bowl, it indicates a leak in the flapper valve that needs to be replaced. Additionally, you can apply this technique to sink drains by adding dye to the sink's water and checking for any color seeping through the pipes. This method helps pinpoint the location of the leak, whether in the toilet, sink, or other fixtures. It is a cost-effective way to identify leaks early and prevent water damage in your home. By conducting regular dye tests, you can stay proactive in maintaining your plumbing system and addressing leaks promptly.
Pressure Testing for Leaks
To detect leaks in your home plumbing system more thoroughly, you can implement the pressure testing method. This technique involves pressurizing your plumbing lines to check for any drops in pressure, indicating a leak somewhere in the system. Here are three key steps to effectively conduct a pressure test:
- Shut off the main water supply: Before conducting the test, make sure to turn off the main water supply to your home. This step is essential to prevent any additional water from entering the system during the test.
- Pressurize the system: Use a pressure testing kit to pump air into your plumbing system. Monitor the pressure gauge for a few hours to see if there are any noticeable drops, which could indicate a leak.
- Inspect for leaks: Once the system is pressurized, carefully inspect all visible pipes, joints, and fittings for any signs of leaking water. Pay close attention to areas where pipes meet walls or flooring, as these are common spots for leaks to occur.
Monitoring Water Meter Readings
Keeping a close eye on your water meter readings can provide valuable insights into potential leaks in your plumbing system. Monitoring your water meter regularly allows you to detect any unusual spikes or constant water usage when no water is being actively used in your home. To start, make sure that all water sources are turned off, then check your meter for any movement. If you notice the meter is still running, it could indicate a hidden leak that needs to be addressed promptly.
To effectively monitor your water meter, record the readings at a set time each day and compare them over time. Sudden increases in water consumption without a corresponding change in your household habits may signal a leak. Additionally, if you suspect a leak but can't locate it visually, monitoring the water meter readings before and after shutting off the main water supply can help pinpoint the issue. By staying diligent and observant of your water meter, you can catch potential leaks early and prevent costly damage to your home.
Thermal Imaging Technology
When it comes to detecting leaks in your plumbing system, one innovative method worth exploring is Thermal Imaging Technology. This cutting-edge technology utilizes infrared cameras to detect temperature differences in your walls, floors, and ceilings, making it easier to pinpoint hidden leaks without causing any damage to your property.
To help you understand the benefits of Thermal Imaging Technology, here are three key points to take into account:
- Non-Invasive Detection: Thermal imaging allows you to identify leaks behind walls or under floors without the need for extensive exploratory work, saving you time and money on repairs.
- Real-Time Results: With thermal imaging, you can instantly see where potential leaks are located, enabling you to take prompt action and prevent further water damage.
- Improved Accuracy: This technology provides precise results, helping you to address leaks early on and avoid costly water bills or structural damage in the long run.
Consider utilizing Thermal Imaging Technology to detect leaks in your home efficiently and effectively.
Conducting Sound Tests
Consider incorporating sound tests as a reliable method for detecting leaks in your plumbing system. Sound tests involve listening for hissing or running water sounds that could indicate a leak. Start by turning off all water sources in your home and ensuring complete silence. Then, use a stethoscope or even a simple screwdriver pressed against your ear to listen closely to different areas of your plumbing system. Pay special attention to pipes, joints, and connections where leaks are most likely to occur.
When conducting the sound test, focus on areas where you suspect a leak might be present, such as under sinks, behind walls, or near the water heater. The sound of running water in these areas can help pinpoint the location of the leak. Additionally, checking for sounds at different times of the day, like late at night when ambient noise is lower, can improve the accuracy of the test. By actively listening for these sounds, you can identify and address leaks early, preventing potential water damage and saving on costly repairs.
Implementing DIY Smoke Tests
To effectively implement DIY smoke tests for leak detection in your plumbing system, gather the necessary materials and follow safety guidelines carefully. Begin by assembling the required items, such as a smoke pencil or smoke match, a blower or fan, and sealing materials like tape or damp towels. Once you have everything ready, follow these steps to conduct the smoke test successfully:
- Seal Off the Area: Close all windows, doors, and vents in the room where the test will be conducted to prevent the smoke from escaping.
- Turn On the Blower: Activate the blower or fan to push the smoke into the plumbing system through the access points.
- Observe Carefully: Watch for any wisps of smoke coming out from potential leaks, such as around pipe joints, connections, or fixtures.
Conclusion
Masterflo Plumbing is North Georgia's most trusted plumbing company, with over 20 years of experience and a team of master plumbers ready to serve your plumbing needs. Whether you need water heater repair or replacement, or have minor or major plumbing issues, you can rely on Masterflo Plumbing to address your plumbing needs in Cherokee County and metro Atlanta.

